django/flask写服务器的文章太多了,这里记录下自己用aiohttp写的过程好了。aiohttp实现,那么这个程序就得是一个协程,来接受一个request,返回一个response。from aiohttp import web
async def hello(request):
return web.Response(text='Hello, world')
由于一个服务器必须能处理url,我们在这段代码下面创建一个app绑定要处理的url并运行:
app = web.Application()
app.add_routes([web.get('/', hello)])  # 绑定hello函数
web.run_app(app)
运行这段代码,然后在浏览器打开http://localhost:8080/会看到网页显示Hello, world。
如果喜欢flask那样的路由,用装饰器绑定,也可以写成这样:
from aiohttp import web

routes = web.RouteTableDef()


@routes.get('/')
async def hello(request):
    return web.Response(text="Hello, world")


app = web.Application()
app.add_routes(routes)
web.run_app(app)
两段代码结果完全相同。喜欢什么,就写成那样就好了。
aiohttp会合并同一路径的所有后续资源添加,为所有的HTTP方法添加唯一的资源,所以添加顺序对性能优化有一些影响。app.add_routes([web.get('/path1', get_1),
web.post('/path1', post_1),
web.get('/path2', get_2),
web.post('/path2', post_2)]
和
app.add_routes([web.get('/path1', get_1),
                web.get('/path2', get_2),
                web.post('/path2', post_2),
                web.post('/path1', post_1)]
第1种先添加同一路径的所有方法的写法,会更好一些。
文档是这样写的,那么我们看看源码是怎么实现的:
self._resources末尾元素的name和要添加的一样,那么直接返回这个元素,不会添加。test函数绑定/test,都再加上post方法,然后print()一下self._resources,第1种写法的结果: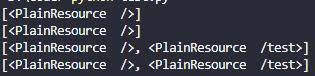
post方法时直接用了已有的资源。
这里以mysql为例, 介绍如何连接数据库。
首先需要一个配置文件放置数据库的地址密码等,于是最好开始拆分文件,比如像我这样:
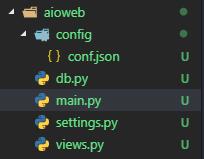
config.json用来存储数据库的配置等,可以是这样:
{
    "mysql": {
        "db": "...",
        "user": "...",
        "password": "...",
        "host": "...",
        "port": 3306
    },
    "update_interval": "0.5"
}
update_interval是我这个项目后面会用到的更新间隔,现在暂时不管它。
然后我们需要读取这个配置文件,写在settings.py里:
import json


def get_config(path):
    with open(path, encoding='utf8') as f:
        config = json.load(f)
    return config


config_path = 'config/conf.json'
config = get_config(config_path)
settings.py的config用于数据库连接?aiohttp.web给app和request、response实现了一个collections.abc.MutableMapping接口,简单来说就是让它们成为类似dict的对象,于是我们可以这样存储数据:from settings import config
app['config'] = config
之后在db.py里读取:
async def mysql_engine(app):
    mysql_conf = app['config']['mysql']
    host, port, user, password, db = mysql_conf['host'], mysql_conf['port'], mysql_conf['user'], mysql_conf['password'], mysql_conf['db']
    ...
在views.py里也可以通过request读取:
async def handler(request):
    config = request.app['config']
request和response的存储方法基本类似:
async def handler(request):
    request['my_private_key'] = "data"
    ...


async def handler(request):
    ...
    response['my_metric'] = 123
    return response
可以给信号和中间件共享数据,这里暂时用不到。
Application.on_startup和Application.on_cleanup信号可以依序设置应用的组件并拆除。aiohttp从3.0起,信号处理程序必须是异步的。mysql可以用aiomysql库,基本语法都和pymysql相似,不再过多介绍。aiomysql引擎:import aiomysql
async def create_aiomysql(app):
mysql_conf = app['config']['mysql']
host, port, user, password, db = mysql_conf['host'], mysql_conf['port'], mysql_conf['user'], mysql_conf['password'], mysql_conf['db']
app['mysql_engine'] = await aiomysql.create_pool(host=host, port=port, user=user, password=password, db=db, loop=app.loop)
async def dispose_aiomysql(app):
app['mysql_engine'].close()
await app['mysql_engine'].wait_closed()
app.on_startup.append(create_aiomysql)
app.on_cleanup.append(dispose_aiomysql)
Application.on_startup和Application.on_cleanup彼此独立,由于互相不知道彼此状态,会发生如果初始化失败,仍然会调用清理信号等状况。Application.cleanup_ctx改成这样:async def mysql_engine(app):
mysql_conf = app['config']['mysql']
host, port, user, password, db = mysql_conf['host'], mysql_conf['port'], mysql_conf['user'], mysql_conf['password'], mysql_conf['db']
app['mysql_engine'] = await aiomysql.create_pool(host=host, port=port, user=user, password=password, db=db, loop=app.loop)
yield
app['mysql_engine'].close()
await app['mysql_engine'].wait_closed()
接着在main.py中注册:
app.cleanup_ctx.append(mysql_engine)
Application.cleanup_ctx是一个异步生成器列表,在yield之前的代码负责初始化,在启动时调用。yield。aiohttp保证清理代码只在初始化成功时才执行。注解
不熟悉异步生成器也没有关系,只要知道这个list的元素类型是这个就行了。另外,Python3.6以上才支持异步生成器,Python3.5需要先pip install async_generator。
想知道aiohttp是如何保证的?这部分的源码是这样的:
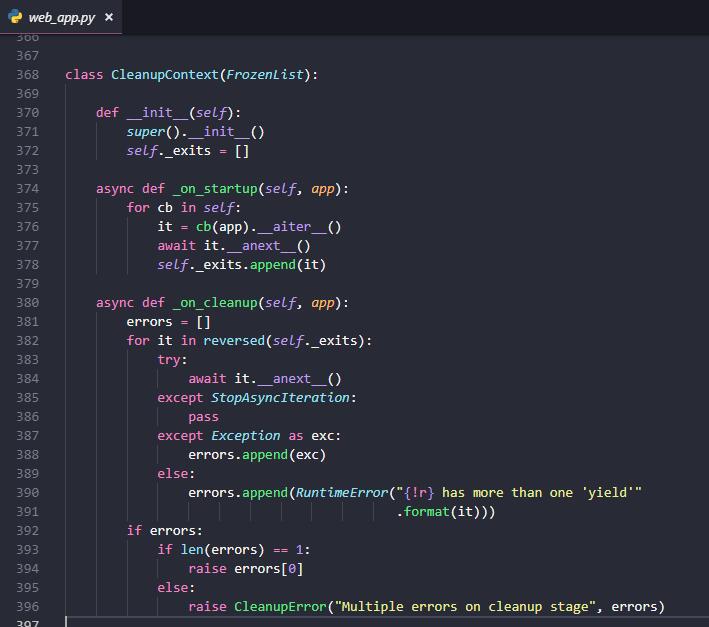
__aiter__和__anext__其实就是__iter__和__next__的异步版本。for cb in self中,self就是Application.cleanup_ctx。mysql_engine,循环中的cb(app)当作mysql_engine(app),cb(app).__aiter__()获取迭代器it。await it.__anext__()让代码运行到yield处,之后self._exits存储当前生成器的迭代器。self._exits就不会放入数据,于是之后的清理代码就不会执行。_on_cleanup中,反转self._exits,从末尾的异步生成器开始,每个异步生成器执行yield之后的清理程序。requests等post到服务器的方式,统一让web应用来处理抓取的内容如何入库,这时就可能需要一个后台任务定时获取数据库中的某个范围(如几天内)的url。db.py中添加如下代码,通过while True无限循环,可以从一个名为crawl_result的表中定时获取2000个url:import asyncio
async def get_old_urls(app):
while True:
async with app['mysql_engine'].acquire() as conn:
async with conn.cursor() as cur:
sql = "select url from crawl_result where link!='' limit 2000"
await cur.execute(sql)
app['old_urls'] = {url for url, in await cur.fetchall()}
interval = float(app['config']['update_interval'])
await asyncio.sleep(3600*interval) # 每隔interval小时运行一次
async def start_background_tasks(app):
app['get_old_urls'] = app.loop.create_task(get_old_urls(app))
async def cleanup_background_tasks(app):
app['get_old_urls'].cancel()
await app['get_old_urls']
接着在main.py中注册:
app.on_startup.append(start_background_tasks)
app.on_cleanup.append(cleanup_background_tasks)
同样的,上述代码中,start_background_tasks和cleanup_background_tasks可以改成:
async def background_tasks(app):
    app['get_old_urls'] = app.loop.create_task(get_old_urls(app))
    yield
    app['get_old_urls'].cancel()
    await app['get_old_urls']
再在main.py中添加:
app.cleanup_ctx.append(background_tasks)
这样,就创建了一个简单的后台任务。
把视图函数改成基于类的视图会更加灵活紧凑。 对于之前的代码:
@routes.get('/test')
async def get_conf(request):
    old_urls = request.app['old_urls']
    head_urls = old_urls[:100]
    return web.Response(text=f'first 100 urls: {head_urls}')
可以改成:
@routes.view('/test')
class Test(web.View):
    async def get(self):
        old_urls = self.request.app['old_urls']
        head_urls = old_urls[:100]
        return web.Response(text=f'first 100 urls: {head_urls}')

    async def post(self):
        post_data = await self.request.post()
        data = {k: v for k, v in post_data.items()}
        return web.json_response(f'{data}')
这个例子中还添加了1个post方法。
注解
web.json_response(f'{data}')方法返回的其实是个str,用requests.get()后用response.json()方法后仍有可能还是str需要再次转换,这时可能是单引号字符串,可以用demjson.decode()转换,如果要用标准库json.loads()方法,需要先把单引号替换成双引号,也就是str.replace("'", '"')。
aiohttp有一个第三方库aiohttp_jinja2支持模板。
在main.py中引入aiohttp_jinja2的基本代码:
from aiohttp import web
import jinja2
import aiohttp_jinja2

from settings import config

from views import routes


if __name__ == '__main__':
    app = web.Application()
    aiohttp_jinja2.setup(app, loader=jinja2.FileSystemLoader('templates'))
    app['config'] = config
    app.add_routes(routes)
    web.run_app(app)
在views.py中的视图函数添加装饰器注明html文件的路径。这个装饰器要位于路由装饰器之下。
@routes.view('/hello')
@aiohttp_jinja2.template('hello/base.html')
class Hello(web.View):
    async def get(self):
        return {'result': "hello world"}
这样表示html文件是templates/hello/base.html。需要这样新建文件夹和文件。
static/css/style.css等文件夹和文件,static文件夹和templates文件夹同一目录。html文件简单写几行代码引入这个css:<head>
<link rel="stylesheet" href="{{ static('css/style.css') }}" type="text/css" />
</head>
然后,在main.py中添加2行代码:
app['static_root_url'] = 'static'
app.router.add_static('/static/', path='./static', name='static')
就能成功引入这个style.css文件。